


Where’s the beef?
by Scotty Irani
Food Columnist
Welcome in, September! School for the kiddos and those in university are in full swing. That means busy and varying schedules for the kids and a lot of late night studying (hopefully) for those preparing for fall semester.
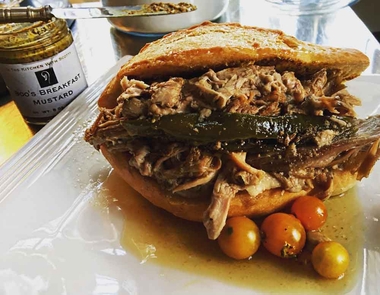
What better way to have a meal hot and ready to go, whatever time of day, than slow cooked Italian style beef, shredded and ready to fill homemade crusty, yet fluffy, rolls? I hope this helps with your hungry household. Enjoy.
For the Beef
3-4 pounds beef chuck roast
12 cloves fresh garlic, lightly crushed
1 medium yellow onion, sliced
In the Kitchen With Scotty “The Roast Beast” Seasoning

3 tablespoons dry Italian herb blend
1/4 cup red wine vinegar
3 Anaheim peppers, halved, seeded and pith removed
1 cup water
Sliced fontina or provolone cheese (optional)
1. Break down chuck roast into smaller pieces (around 3-4 chunks) and place in bottom of your crock pot or slow cooker. Trim large excess fat. Coat the pieces generously all over in Roast Beast Seasoning and lay into the bottom of the crock.
2. Sprinkle sliced onions and garlic cloves over top - even lift some of the pieces up so the onions and garlic get underneath the meat - then lay out the sliced and seeded peppers on top. Add the dry Italian herb blend evenly over the top of the meat.
3. Pour in water and vinegar. Cover and cook on low for 7-9 hours or until meat can be easily shredded.
4. Serve in lightly toasted or butter-grilled French rolls, dressed on both sides with your choice of mayo and/or mustard and with plenty of au jus from the crock for sandwich dunking. Don't forget the cheese if you like…add a few slices onto the hot meat and let it melt in.
For the French Rolls
(can be made ahead of time, wrapped tightly and frozen up to one week)
1 tablespoon dry active yeast
1 1/2 cups warm (about 100 degrees) water
2 1/2- 2 3/4 cups bread flour (or all-purpose flour)
1 1/2 teaspoons salt
Water spray bottle
1. In your stand mixer bowl add warm water and yeast. To that add one cup of flour and mix briskly with a hand whisk. Let the yeast bloom (around 20 minutes) to make sure it is active.
2. Once the mixture is bubbly and active attach the dough hook to your mixer. Add in another cup of flour and begin kneading with the dough hook. You may have to stop and scrape down any excess flour clinging to the bowl. You’ll start to form really sticky wet dough. Keep kneading. Add in the additional 1/2 cup and keep kneading…in fact, keep adding in flour a little at a time at this point, just until the dough starts pulling away from the bowl while kneading. You should run the mixer and knead for approximately five minutes.
3. Once the dough has started to pull away and you have given it a good knead, scrape the slightly sticky dough out onto a lightly floured surface. Knead to a smooth ball and place into a lightly oiled bowl. Cover with plastic wrap and place in a warm spot to rise until doubled, approximately 45-60 minutes.
4. Once doubled, lightly punch down the dough and pull out onto the same floured surface. Pat dough into a rectangular shape, cut in half lengthwise, then evenly cut out six same sized portions, three from each half. Roll each of the six portions into a smooth ball, cover and let rise another 20 minutes. Just enough to relax the dough and get another rise.
5. Place one of the balls onto the surface. With your finger pat down the dough ball flat into a rectangle. With the long side closest to you, roll up the dough as you would a cinnamon roll or jelly roll. Then begin to gently roll the dough back and forth as if you were rolling a cord (or making a “snake”). With your hands at a 45-degree angle move them to the ends of the roll to taper (make pointed) ends. Your dough should look like a pointy football or what I think looks like a sweet potato.
6. Place three rolls onto a lined sheet pan. Do the remaining dough balls the same way, reserving three of them onto platter or using an additional lined sheet pan for baking. Cover rolls with a dry cloth and let rise another 20-25 minutes.
7. While the rolls are rising, preheat your oven to 450 degrees. Place a deep dish of water (I used a pie plate) into the bottom of the oven. Water in an oven creates moisture and helps to form a crunchy outer crust of the rolls.
8. Once the rolls have risen, use a sharp knife or razor blade to score your rolls. Make a long cut, off center, lengthwise, down your roll. Do this for each of the rolls.
9. Spritz rolls all over with the water bottle and place into the oven for 10 minutes. Rotate the pan; spritz the tops and sides again with water. Bake an additional 10 minutes. Once golden brown and crisp on the outside remove the rolls and cool to at least “warm” before cutting or storing.
Copyright 2017 The Gayly – September 6, 2017 @ 11 a.m. CDT.